Is your bathroom stuck in a time warp? Are your kitchen backsplash tiles chipped, stained, or just plain outdated? Replacing old tiling might seem like a daunting job best left to the pros, but with the right preparation and method, it’s a very achievable DIY project that can completely transform a space.
At FixGuru.hu, we believe in empowering homeowners. This guide will walk you through the simple steps of replacing old tiling, helping you avoid common pitfalls and achieve a beautiful, professional-looking result.
Safety First! Gear Up for the Job
Before you swing a hammer, protect yourself. Tiling work creates sharp debris and dust.
-
Eye Protection: Safety goggles are non-negotiable.
-
Gloves: Heavy-duty work gloves protect your hands from sharp edges.
-
Respirator/Mask: A dust mask or respirator is essential, especially when breaking old tiles or mixing mortar.
-
Ear Protection: Hammers and chisels are loud.
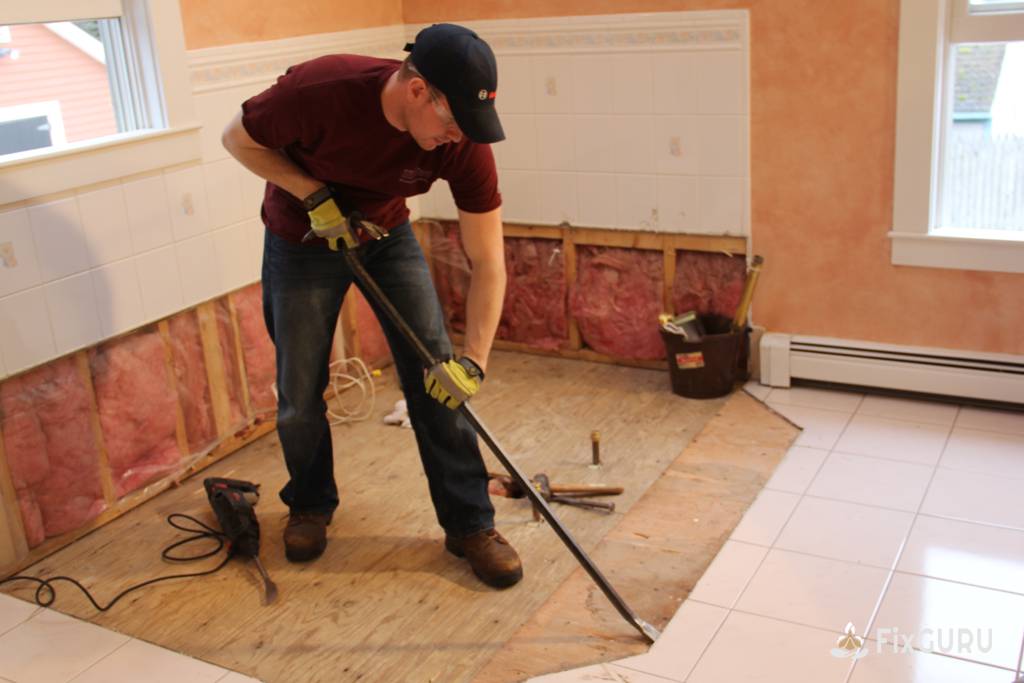
Step 1: The “Demo” Phase – Removing the Old Tiles
This is the most physically demanding part of the job.
What You’ll Need:
-
Hammer
-
Cold Chisel or a flat pry bar
-
Safety Gear (see above)
-
Mallet (for a chisel)
-
Optional but Highly Recommended: An electric rotary hammer with a chisel bit.
The Process:
-
Start at a Grout Line: Begin at the edge of the tiled area or in a damaged spot. Place your chisel on a grout line and tap it firmly with a hammer or mallet.
-
Work in Sections: Don’t try to pry off one perfect tile at a time. The goal is to break the bond. Once you get a tile loose, you can often slide the chisel underneath it and pop off neighboring tiles.
-
Mind the Wall: Be patient. If you use too much force, you can easily damage the drywall or cement board underneath, creating more work for yourself later. The underlying surface doesn’t need to be perfectly clean, but it should be solid and flat.
-
Clean Up: Once all tiles are removed, use a scraper to remove as much of the old adhesive (thinset) as possible. Sweep and vacuum the area thoroughly.
Pro Tip: For floors, start in the center of the room. For walls, start from the bottom and work up. Cover drains and fixtures with tape to prevent debris from clogging them.
Step 2: Prepare the Surface – The Key to a Flawless Finish
You cannot tile over a weak or uneven surface. This step is crucial for long-lasting results.
-
Inspect the Substrate: Check the wall or floor (the “substrate”) for any damage. If it’s drywall with minor holes, you can patch it. If it’s severely damaged or soft, you must cut it out and replace it with new drywall or, for wet areas, cement board.
-
Check for Level: Use a long level or a straightedge to check for dips and humps. For floors, any significant unevenness should be addressed with a self-leveling compound.
-
Clean: The surface must be free of dust, grease, and any debris. A quick wipe with a damp sponge before tiling is a good final step.
Step 3: Dry Fit and Plan Your Layout
Don’t just start slapping tiles on the wall with adhesive! A little planning prevents awkward, skinny cuts at the most visible parts of the room.
-
Find the Center: Find the center point of your wall or floor.
-
Lay a Trial Row: Using tile spacers, lay a row of tiles along the floor and up the center of the wall. This helps you visualize where the cuts will fall.
-
Adjust for Balance: The goal is to have the tiles at the edges (the “cut” tiles) be as large as possible. It’s much better to have a 3/4 tile at both ends than a tiny sliver. Adjust your starting point accordingly.
Step 4: The Fun Part – Installing the New Tiles
What You’ll Need:
-
Notched Trowel (notch size depends on your tile, check the adhesive instructions)
-
Tile Adhesive (Thinset Mortar) – use a polymer-modified type for better strength.
-
Bucket and Mixing Paddle (for a drill)
-
Tile Spacers
-
Tile Cutter (a simple snap cutter for straight cuts, a wet saw for complex cuts)
The Process:
-
Mix the Adhesive: Follow the package directions to achieve a smooth, peanut-butter-like consistency. Let it “slake” (rest) for the recommended time, then remix briefly.
-
Apply the Adhesive: Using your notched trowel, spread a manageable amount of adhesive onto the substrate. Hold the trowel at a 45-degree angle to create consistent ridges. Only spread as much as you can tile in 15-20 minutes.
-
Set the Tiles: Press each tile into place with a firm, slight twisting motion. This ensures full coverage and a strong bond. Use tile spacers at every corner to maintain even grout lines.
-
Check for Level: Frequently use your level to ensure the tiles are flat and even. Adjust as needed before the adhesive sets.
-
Make Your Cuts: Measure and mark tiles for cuts around outlets, corners, and edges. Use your tile cutter or wet saw for precision.
Step 5: Grouting and Finishing
Let the tile adhesive cure completely (usually 24-48 hours) before grouting.
-
Remove Spacers: Pull out all the tile spacers.
-
Mix the Grout: Mix the grout to a paste-like consistency.
-
Apply the Grout: Using a rubber grout float, spread the grout diagonally across the tiles, forcing it deep into the joints.
-
Clean the Tiles: After about 15-30 minutes (check grout instructions), use a damp (not wet) grout sponge to wipe the excess grout off the tile surface, again moving diagonally. Rinse your sponge frequently.
-
Polish and Cure: Once a hazy film forms (a few hours later), buff the tiles clean with a soft, dry cloth. Allow the grout to cure for the recommended time before exposing it to moisture.
A Note on Modern Materials
The tiling world has evolved! While the classic mortar-and-grout method is tried and true, homeowners now have other options. For example, a growing trend for kitchen backsplashes is the use of peel-and-stick tile mats. These products allow you to apply new tiles directly over old, clean tiles or a smooth surface, eliminating the messy demo work. While perfect for small, low-moisture areas, it’s crucial to know that for showers or floors, the traditional method is still the gold standard for durability.
Replacing old tiling is a rewarding project that boosts your home’s value and aesthetic. By taking it one step at a time and focusing on preparation, you can achieve a stunning result you’ll be proud of for years to come.
Happy tiling!
The Team at FixGuru.hu